It has been a few days since I deployed my new blog to the public. After that, I had great real-world insights into how my site was performing worldwide. Page load speed, latency, etc., can have a huge impact on the user experience of a website or web application. Even though my asset-heavy site performs 'oK' with Vercel's CDN, I wanted to improve it. The FCP and LCP insight from 135 data points are 3.58s and 3.07s, respectively. It resulted in an overall score of 57. In my pursuit to improve this, I had a few options in mind, like Cloudinary, ImageKit etc. But I wanted to try out AWS. I don't think I have to emphasise that AWS is awesome. So I just headed over to the AWS console and wired it up (Obviously, after reading the docs for a few hours or so 😂).
Prerequisite:
What is an S3 bucket?
The Simple Storage Service(S3) is a storage solution from AWS. It is basically an online storage service that allows you to store and retrieve data, such as images, videos, documents, and more. An "S3 bucket" refers to a storage container in S3. Each bucket has a unique name and can be located in a specific AWS region.
What is a CDN?
CDN stands for Content Delivery Network. It is a distributed network of servers that work together to deliver web content, such as images, videos, scripts, and other static or dynamic files, to end-users based on their geographic location. CloudFront is a CDN offered by AWS, which securely transfers content to the clients with speed.
Step 1: Create a bucket!
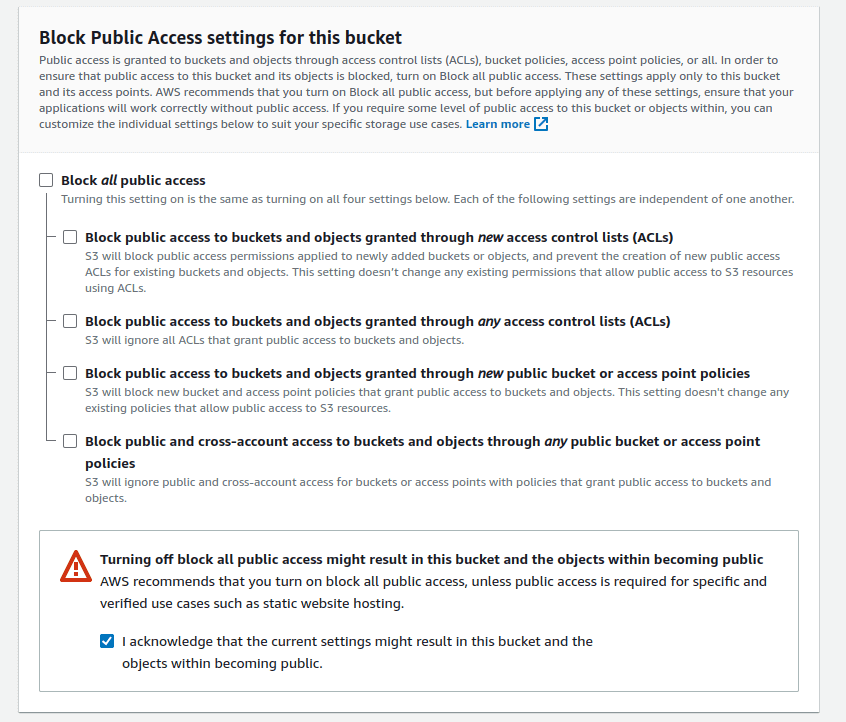
This is a relatively simple step, head over to the AWS console and search for S3 and create a bucket turning off "Block all public access". Basically, a public bucket 😂 (some settings are confusing). Set object ownership to however you have your account configured. After uploading the assets, let's move to the next step.
Step 2: Add a custom domain(optional)
This was something that I wanted to do to keep my domains and subdomains more accessible. I wanted static.justgokul.dev to be the root of all my static assets. For that, I had to request an SSL/TLS certificate from ACM(Amazon Certificate Manager).
To do this, search for ACM in the AWS console -> request certificate -> request a public certificate -> and enter your domain name (static.justgokul.dev in my case), then create. After creation, go to the certification and check the domains section to find a CNAME record.

For people using Route 53, add the record, and you are good to go. But for me, in my case, I have to add it to my Google domain's DNS records.
Host name                       Type        Data
-------------------------       -----       -------------------------
_xN.static.justgokul.dev        CNAME       _xM.acm-validations.aws.
Reference: How CNAME records for ACM work, Add a custom domain managed by Google Domains
After the validation is done, we can move to the next step.
Step 3: Create a CloudFront distribution
To create a CloudFront distribution, search for cloudfront in the AWS console and click 'Create a distribution'.
- Choose the origin domain so that it points to the S3 bucket we created
(e.g., name.s3.amazonaws.com) - Change the 'Viewer protocol policy' to 'Redirect HTTP to HTTPS'
- In the Settings section: Add 'Alternate domain name' (
static.justgokul.devin my case).; and choose the SSL certificate that we created earlier.
This creates a CloudFront distribution for our storage bucket.
The next step is to add the CloudFront URL to the DNS record of our domain provider.
Host name                       Type        Data
-------------------------       -----       -------------------------
static                          CNAME       Distribution domain name
This will allow us to access the distribution using static.justgokul.dev.
Now any assets present in the bucket can be accessed globally through the CDN via the URL.
eg: https://static.justgokul.dev/matrix.png
Now as I am using NextJs, I have a tiny little step to do. In my next.config.js, add my static assets domain.
const nextConfig = {
  images: {
    domains: ['static.justgokul.dev'],
  },
};
Now I can access all the assets using the full URL.
Reference: NextJs docs
With this, we have a CDN delivering assets faster, plus a clean and light codebase. Thats it! With the assets delivered much faster, we will have a significantly better FCP and LCP scores!
More fun stuff awaits! Happy hacking!